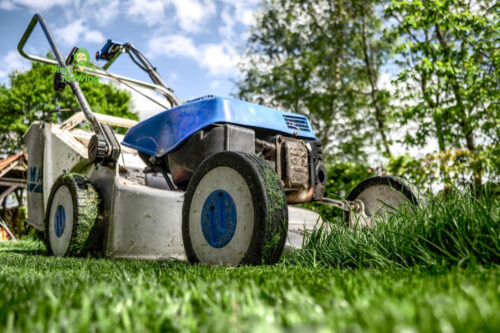
Is your lawn mower lagging or leaving your grass looking a bit sad after mowing? It might be time to sharpen your mower blades. An often overlooked job, it makes sense that to get a clean cut on your lawn, your blades need to be equally as clean.
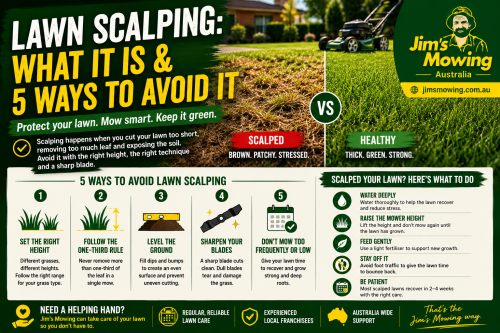
Whilst your lawn can still be cut with blades a little duller than usual, it isn’t healthy for your grass, and is a common lawn mowing mistake. Blunt blades can result in torn grass, leaving lawns vulnerable to disease—and isn’t great for the overall look, either. Dull blades can leave you with a lawn that looks raggedy and unfinished, impacting the overall aesthetic of your property.
Pulling apart your lawn mower to sharpen its blades can be quite daunting, especially if you’ve never done it before. However, the Jim’s Mowing experts are here to help you with our step-by-step guide on how you can safely sharpen your lawn mower blades at home.

What You Need
Here’s a list of the basic tools you’ll need to safely and efficiently sharpen your lawn mower blades:
- Wrench or socket set
- Putty knife or scraper
- Metal file or drill-powered blade sharpener
- Bench-mounted vice
- Safety glasses
- Work gloves
- Marker or spray paint
- Balancing tool (a nail or blade balancer)
Our Step-by-Step Guide to Sharp Blades
1. Make it safe
The first step to sharpening your blades is to ensure that your lawn mower is powered off, and the ignition wire is removed from the spark plug. If you have a cordless mower, remove the battery pack. Following this, drain the gas tank to prevent any fuel spills during the process.
2. Removing securing measures
Mowers have safety mechanisms in place to ensure the blades are securely fastened, so you’ll need to carefully un-do these. Start by tipping the mower on to its side to gain access to the lawn mower blades. Place a wooden block between the blade and the mowing deck to prevent the blade from moving, and then loosen the nut or bolt with an appropriate wrench.
3. Removing the blade
Before removing the blade, it’s important to remember its orientation in the mower. We recommend either marking the blade with spray paint or a permanent marker on the upward-facing side, or taking a picture of the assembled blade to remind yourself later on. Now you can simply remove the blade carefully, with a reminder of what way to replace it later.
4. Cleaning
While your mower is disassembled, take the time to clean the underside of the mowing deck and blade to ensure they’re free of any buildup or debris. This can be done with a narrow putty knife and bristle brush.
5. Clamping the blade safely
To ensure that you can sharpen the blade safely, ensure that you clamp your blade securely to a bench-mounted vice, with one of the cutting edges facing upward. These cutting edges only span about 7 to 10 centimetres of the blade.
6. Sharpening
Before beginning any sharpening, you need to ensure that all safety measures are in place; safety glasses, safe environment, etc.
If you’re confident, you can use a drill powered blade sharpener, but we recommend using a metal file if you want to take it slower with more control. Identify and file in the direction of the original cutting angle, and apply enough pressure to efficiently sharpen it. Your blade should be the sharpness equivalent to that of a butter knife when finished. Be sure to sharpen both sides of your blade, not just one!
7. Balancing the blade
Next, you will need to ensure that the blade is balanced—it’s an equal weight all-round. In the process of sharpening the blade, it can become unbalanced, which can possibly damage your lawn mower. To check your blade’s balance, simply place the centre hole of the blade onto a protruding nail from a wall and let go. A balanced blade will stay level, whereas an unbalanced one will dip towards the heavier side. If unbalanced, sharpen the heavier side of the blade slightly until it hangs level on the nail.
8. Reassemble
Lastly, you need to reassemble your lawn mower back to its original state. Use your markings or images from step three to guide you through this process. Ensure that the nut or bolt is secured tightly, and that everything is assembled properly. Now you’re ready to take your mower out for a test drive!
When to Sharpen and Replace Lawn Mower Blades
There are only so many times you can sharpen your blades before they need to be replaced. Here’s how to tell when you’ve reached that point:
When to Sharpen
- Uneven cut: If your mower is leaving uneven patches on the lawn or if the edges of your grass appear ragged and torn rather than cleanly cut, the blades are likely dull.
- Clumping grass: Dull blades can cause clumps of grass to gather rather than being evenly spread out. If your lawn mower leaves behind a trail of clumped grass, it’s a sign the blades need attention.
- Increased effort or lagging: If it seems like your mower is struggling or bogging down more than usual, it may be time to sharpen the blades, as dull blades require more power to cut through the grass.
When to Replace
- Deep nicks or cracks: If the blade has been damaged with deep nicks, cracks, or chips, it’s best to replace it rather than try to sharpen it. A damaged blade can cause more harm to your mower and your lawn.
- Excessive wear: Over time, repeated sharpening will cause the blade to wear down, reducing its effectiveness. If your blade is too thin or misshapen after multiple sharpenings, it’s a good idea to replace it.
- Rust and corrosion: If your blade has significant rust or corrosion, it may not be as effective or safe to use. In these cases, replacing the blade will help ensure optimal performance.
Call the Professionals!
We understand that sharpening your blades can be intimidating. If you want to ensure that your lawn is trimmed to a professional standard without the pressure and safety concerns, call in the experts. At Jim’s Mowing, we can professionally mow your lawn without all the hassles of doing it yourself. Get in touch with us today, or take a look at our extensive range of lawn and garden services.